The Owl, The Thief and The Strawberries
Jigsaw Puzzle Mechanics
Hey! I'm again a little late for the weekly Friday update. I thought I'd do a bit of a deeper dive this time, into the new lore-related features. Most of the work went into implementing a jigsaw puzzle feature:
Creating the images
Each jigsaw puzzle is defined with 2 images:
- The actual puzzle image
- A colour map that defines the puzzle pieces
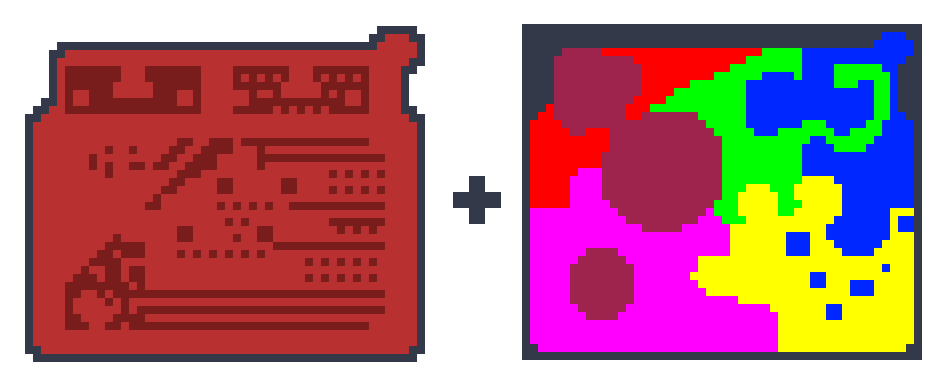
Split image into pieces
We want to read the colour values from the colour map, and use them to create each piece. The total number of pieces in the puzzle will be equal to the number of unique colours in the colour map. Create a new graphic for each piece and set all pixels to transparent. Then loop over the pixels in the colour map, and depending on the colour, set the "actual image" pixel in the corresponding piece graphic.
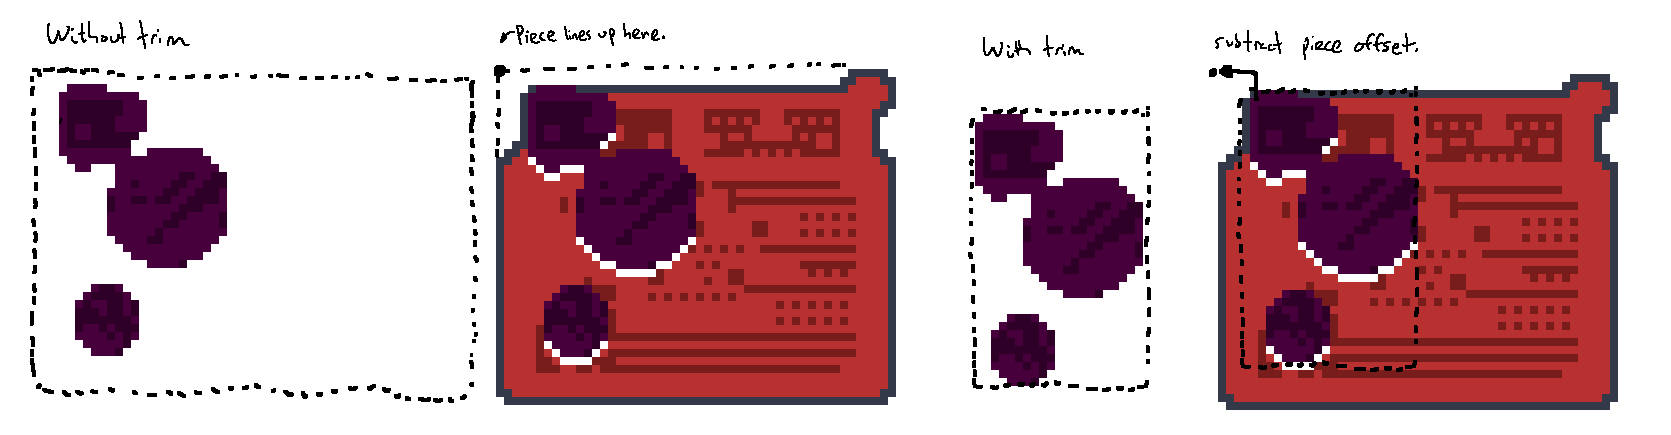
For a basic puzzle mechanic without rotation, we can stop here - every piece will technically be the same size as the original puzzle, but the transparent pixels will mean players won't be able to tell. If rotation is required, the transparent pixels should be trimmed + a width and height should be associated with the piece. It's also useful to store an "offset" value which describes "how much the piece's X and Y position differs from the overall puzzle X and Y". As seen below, I did this as part of the "trim transparency step" - every full column of transparent pixels on the left adds 1 to OffsetX, and full rows on top add 1 to OffsetY.
Here's some vaguely-C#-like pseudo code for the process described above:
public class Colour
{
  public float R, G, B;
}

public class Texture2D
{
  public int Width;
  public int Height;
  public Colour[] Data;
}

public class PuzzlePiece
{
  public int OffsetX;
  public int OffsetY;
  public Texture2D Data;
}

public PuzzlePiece[] CreatePiecesFromImage(Texture2D image, Texture2D colourMap)
{
  var distinctColours = colourMap.Data.Distinct();
  var numPieces = distinctColours.Count();
  var pieceColourData = new Colour[colorMap.Width * colourMap.Height][numPieces];
  var result = new PuzzlePiece[numPieces];

  // Read each colour into separate "piece" textures.
  for(var i = 0; i < colourMap.Data; i++)
  {
     var thisPixelColour = colourMap.Data[i];
     var colourIdx = distinctColours.IndexOf(thisPixelColour);
     pieceColourData[colourIdx][i] = image.Data[i];
  }

  // Trim each texture and store "how much" was trimmed from left (X) and top (Y).
  for(var i = 0; i < numPieces; i++)
  {
    var (offsetX, offsetY, trimmed) = TrimTransparentPixels(pieceColourData);
    result[i] = new PuzzlePiece { OffsetX = offsetX, OffsetY = offsetY, Data = trimmed };
  }

  return result;
}
Checking for correct positioning is easy
If the pieces haven't been trimmed, all you need to do is check that each piece's position is set to (0, 0)! (Or wherever the puzzle's overall position is set to.) If the pieces have been trimmed, just check if [piece position - offset] is set to (0, 0).
currentPiece.X += moveByX;
currentPiece.Y += moveByY;
const int closeEnoughLeeway = 5;

if(Math.Abs(currentPiece.X - currentPiece.OffsetX) < closeEnoughLeeway)
{
  if(Math.Abs(currentPiece.Y - currentPiece.OffsetY) < closeEnoughLeeway)
  {
    // This position is only considered correct if the piece is not rotated from original.
    if(currentPiece.TargetRotation == 0)
    {
      // Piece is near final position. Lock into place.
      currentPiece.X = currentPiece.OffsetX;
      currentPiece.Y = currentPiece.OffsetY;
      currentPiece.LockedIntoPlace = true;
    }
  }
}
Animating Rotation with Circular Lerp (CLerp)
If you use a linear interpolation (lerp) function to move the piece rotation to a target rotation, you run into problems when moving from e.g. 5 degrees to 355 degrees: ideally the function would know to take the "short path" as 5,4,3,2,1,0,359,358,357,356,355, but of course lerp will take the long way and the piece will almost make a full circle to get to the target position.
We need to define a "circular lerp" or "angle lerp" that will handle this case. The extra logic boils down to "if we're lerping a big distance, normalise one of the values so a normal lerp can handle it":
public class PuzzlePiece
{

  ...

  public int TargetRotation; // Set to 0, 1, 2, or 3.

  // Math.HalfPi in radians == 90 degrees.
  public float TargetRotationAsAngle => TargetRotation * Math.HalfPi;
  public float CurrentRotation; // Animated - move towards target.

  ...

  public void OnRotate()
  {
    TargetRotation = (TargetRotation + 1) % 4;
  }

  // Run every frame.
  public void Update()
  {
    ...
    CurrentRotation = CircularLerp(CurrentRotation, TargetRotationAsAngle, 0.1f);
  }

  // Like Lerp, but take short path between 0 and 2*Pi (360 degrees).
  private static float CircularLerp(float a, float b, float t)
  {
    if (Math.Abs(a - b) >= Math.Pi)
    {
      // The difference is 180 degrees or more, so a wraparound may be required.
      // "Normalise" one value by adding 180 degrees, applying mod of a full circle (2*Pi),
      // then subtracting the 180 degrees back out. This may result in a negative number.
      if(a > b)
      {
        // We can use C#'s remainder modulo (%) here because we never pass in negative values.
        // If negative values need to be supported, this should be swapped out for a "true mod".
        a = (a + Math.Pi) % Math.TwoPi - Math.Pi;
      }
      else
      {
        b = (b + Math.Pi) % Math.TwoPi - Math.Pi;
      }
    }

    // Do the actual lerp on the normalised values.
    var result = Math.Lerp(a, b, t);

    // Keep the result within the range [0, 360).
    if(result < 0)
    {
      result += Math.TwoPi;
    }

    return result;
  }
}
This took me way too long to get right... now that it's in place the logic isn't too hard to follow though!
Other rotation considerations
Say a certain piece has an initial width of 50 and a height of 10. When the piece is rotated 90 or 270 degrees, these width and height values will be completely off! Same for X and Y position: a rotation will not look "centred" if the piece's central point stays as (25, 5) for all rotations. To get around this, I set a Rectangle "bounding box" which describes the rotation-aware position of the piece. This means the actual X and Y values can stay consistent during rotation, and the bounding box can just be used for e.g. bounds detection.
// If a piece is rotated 90 or 270 degrees, swap width and height.
private int Width => TargetRotation is 0 or 2 ? BaseWidth : BaseHeight;
private int Height => TargetRotation is 0 or 2 ? BaseHeight : BaseWidth;
public Rectangle BoundingBox => new Rectangle(
  TargetRotation is 0 or 2 ? X : X + (BaseWidth - BaseHeight) / 2,
  TargetRotation is 0 or 2 ? Y : Y + (BaseHeight - BaseWidth) / 2,
  Width, Height);

...

public void OnMove()
{
  var boundsXDiff = BoundingBox.X - X;
  var boundsYDiff = BoundingBox.Y - Y;
  if(BoundingBox.X < 0)
  {
    X = -boundsXDiff;
  }
  if(BoundingBox.X + BoundingBox.Width > ScreenWidth)
  {
    X = ScreenWidth - boundsXDiff - BoundingBox.Width;
  }

  // Same for Y values.
}
Polish
On top of this basic functionality, here's the short list of "polish" features used to improve the feel of the mechanic:
- Instead of "snapping" into position when nearby, the pieces will enter a "no interaction" mode and lerp to the intended position - only snapping into place when very very close.
- When opening a puzzle, the pieces will fall from the top of the screen. When closing a selected puzzle, the pieces will fall off the bottom of the screen.
- Pieces are given a random position around the outside of the puzzle, which is centered on the screen.
- When a particular piece is selected, it is raised by 1 so the player can see which piece has been selected. On a failed place attempt, the piece is lowered again temporarily for additional feedback.
- Add a "silhouetted" piece behind the actual piece, offset by (1, 1) to give the pieces some depth. The offset is (1, 1) regardless of current rotation.
- The first piece is considered the "frame" piece and will also be locked into position. This gives a starting point for each puzzle so the player knows where to try placing the pieces.
Other lore mechanics
The jigsaw puzzle mechanic was just part of the work to add lore pickups to the game. Throughout the library, these puzzle pieces will be hidden in secret locations that the thief will need to discover. The puzzles can only be constructed once the pieces have been found.
Next Steps
I'm moving on from the lore feature for now - once a few extra mechanics have been added, I'll do another pass on the actual puzzle artwork and actually design levels where the pieces can be found. See you in the next one!
Comments
Log in with itch.io to leave a comment.
nice work :)
I love this feature so much ^_^